

Very intricate, very laborious but very rewarding art. They are (painted) paper mosaic landscapes courtesy of year 5 and 6. Most of the scenes depicted are directly inspired by landscape photographs, some are a fusion of different photos and a few are entirely imagined. Islands and icebergs, mountains and rivers, rocks, roads, oceans, jetties and sunsets—there's a great variety of scenery, and as with all good landscape art, it's very easy to stop and stare at these beautiful natural environments.
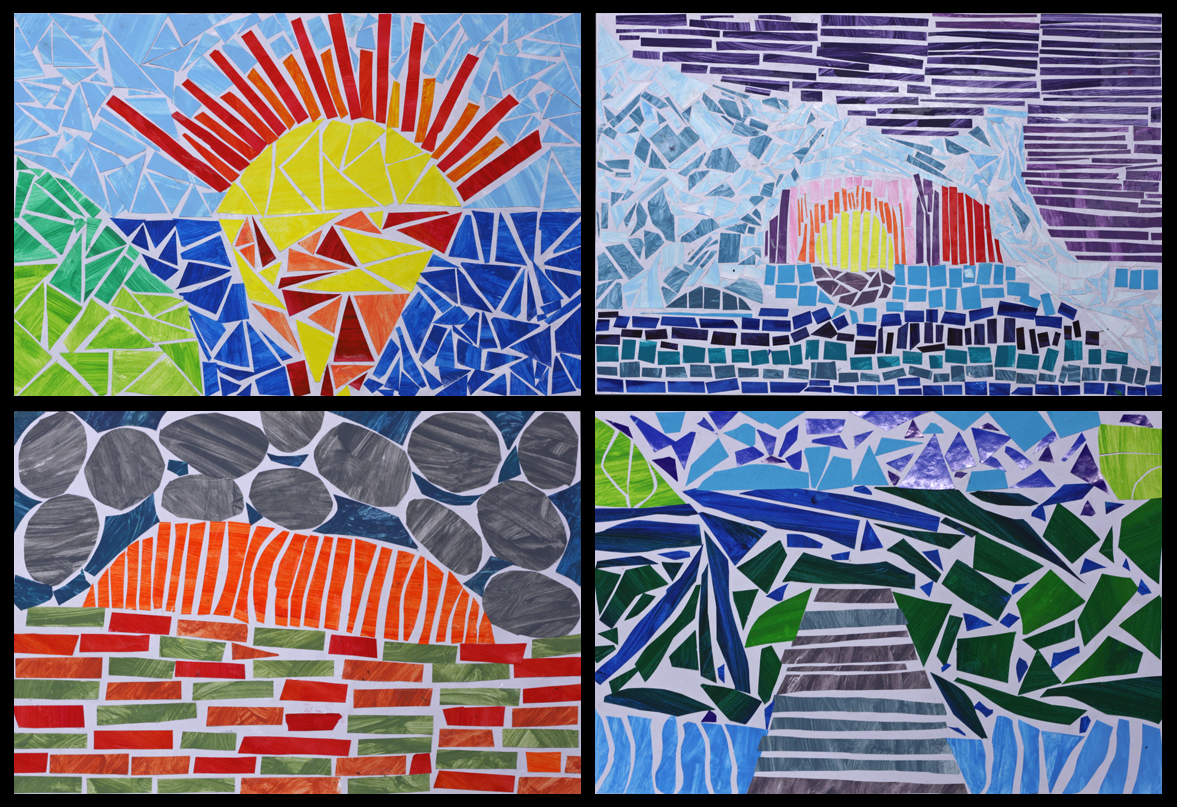
The first and probably most enjoyable part of the process was painting all the paper. We gathered a tonne of scrap paper (just regular old copy paper) and went a bit wild with the paint, making numerous colour mixes, tints and shades. The unprinted side of each A4 sheet was quickly painted one colour, then the mix was tweaked (darker or lighter or greener etc) and another full sheet was painted. And so the process continued until virtually every flat surface in the room was covered in dozens and dozens of differently coloured pieces of drying paper. Once dry, the paper was flattened underneath a pile of atlases (proving that a printed map is still more useful than a GPS!). The speed of the painting also left lots of visible brushstrokes, which made for a very textural look on the mosaics.

The students then made planning sketches based on a series of landscape photos that I showed them. I had a quick conference with each student and made sure that they had a strong composition that was distilled down to the basic shapes and free of overly intricate details (e.g. just foreground, mountain, sky etc). They also wrote down the colours they intended to use in each area.
Next they very lightly drew in some guide lines on their good piece of art paper. Finally they began the laborious task of blocking in each segment of their landscape by cutting and pasting down pieces of the paper we had painted previously. As well as deciding exactly where to place all those great colours, other goals included gluing each piece of paper so it didn't touch its neighbour, and also to rub out the pencil guides before they were immortalised in glue!

This cutting and pasting part of the process was quite taxing on their patience and admittedly the enthusiasm had waned for a few students towards the end... Hopefully it was patience-promoting rather than patience-demanding. It took around 5 weeks to complete and made for a fantastic class display at their school art show. Well done any 5/6 students who are reading this : ) I think that may be the first time I've used the word fantastic on this blog!

Ohhh these are lovely! You can really tell your students put a lot of love and effort into creating these mosaics!
ReplyDeleteThank You! It's great to find other Aussie art bloggers! : )
DeleteThese are very impressive! I love the fact that the students created them with painted paper rather than colored construction paper. And their patience really paid off - Well done!
ReplyDeleteThanks Mary! And yes I was really happy with the finish of the painted paper : )
ReplyDeleteYou must have have known in your heart that these would work, because this is a huge commitment from all of you. What size are they? Great effort.
ReplyDeleteThanks Gretchen, I was certainly hoping they'd work! I think it was a bit bigger than A3..
ReplyDeleteThese are so beautiful!
ReplyDeleteThanks Michele : )
ReplyDeletethese are stunning! the colors, individual shapes, and overall compositions are so sharp:)
ReplyDeleteThanks Don! I learn so much every time I visit your own blog : )
ReplyDeleteFantastic - they should be proud
ReplyDeleteJust found your blog and I must say I love your projects. This one especially. beautiful!
ReplyDelete